Labels

Tuesday, June 4, 2013

Garden Critters

Short post today because I have some cute pictures to share. 
Here are some adorable little friends I have encountered in my garden this season. 


This poor little guy slammed into our front windows. He was pretty dazed and was willing to hop on my hand. I put him up in a tree to keep him away from the mean old cat next door. 
Gulf coast ribbon snake (or Texas Patchnose snake?)
 I think its hole flooded, because this was a few hours after we had 3 inches of rain.
 He climbed up on the window sill of our screen porch. 
Tree Frog hiding inside a corn stalk.


Rough earth snake. I see him or his friends often when I move pots around.
 They hang out under pots, and hold very still when spotted, but as soon as you look away, they disappear. 
Berwyn says: Where'd my squirrel go, you guys? 

Sunday, May 26, 2013

Front Yard Veggies!


So I have this enormous bed in the front yard, and it's a huge waste of space and water unless it grows something useful. Do you see edibles in here? Would it surprise you if I said there were 23 edible plant varieties in my front yard? Let me explain.

Let's start with the obvious: Trees. In this picture, we have sour orange and loquat. Off-screen are a grapefruit tree and a fig tree.  (You also see a date palm, two tall citrus trees and two pecan shrubs. None of these produce anything useful, so they don't count. As soon as we either buy this place or convince the landlord, they're coming out.)

Next, Herbs: rosemary in the front, dill (mixed with the asparagus fern), oregano (mixed with the Wandering Jew), lemon basil (planted in a row to the right of the screen, between flowers), and thyme (hard to see, but in a tiny row with the flowers, by the white rock.) I also have some very vigorous turmeric (technically a spice, not an herb.)
The less-neon part is dill.

Turmeric
Basil
Veggies! Yep, veggies. Ok, fruits and veggies. Tomatoes (bottom right corner, by the black stand), sorrel (neon green, lemon flavored lettuce, planted with RB Beans), Royal Burgundy Beans (throughout, visible by the rosemary in front), spinachpole beans (around the pine tree) and lettuce (on the left).
Royal Burgundy Beans and Sorrel
Just look at that fabulous lettuce!


Not visible, but also important: peanuts (hiding in the back), and some shallots,  red and white onions, more basil (Italian and Armenian), tomatillos, and hot peppers which have been planted but are not showing up in the photo yet.
Peanut
Pole beans
Spinach

June 3: I pulled the rest of the pansies out and, with the help of Mrs. A, tilled in some garden soil and fresh compost and planted zucchini, more sorrel, and carrots in the wedge between the pine tree and the date palm. When those spring up, that will bring the count of edibles to 25.


Friday, May 10, 2013

Sugar Snap Peas!

Instead of posting a whole bunch of garden updates, I thought I'd do better to focus on one veggie at a time and follow the progress. I'll update as needed.

For starters, let's look at the one I was most looking forward to when I busted out my seed catalog in December.
Burpee Super Sugar Snap Peas.

January 18: I put 16 Sugar Snap Peas in the fresh soil.
January 22 Seeds have been in the ground for 4 days now, and I have added a trellis ( thinking positive thoughts for future growth!)
January 25: After 7 days, sprouts begin to emerge.
February 17: I'm getting impatient, so I plant 12 more SSP's in the space between the two trellises.

February 20: Seedlings are 33 days old (from day planted).

February 24: SSP's Round Two have sprouted.
March 22 Lots of flowers and pods.

April 1 Mature vines looking good and new seedlings getting going well.

April 8 Look at them go!

April 14 

By the end of April, both Round 1 and Round 2 had slowed down. I pulled them out in mid-May, at a final height of over 6 feet.
These were fun while they lasted, but certainly had a limited run. I will definitely plant them again, and hope that they do better in the cool season. I noticed that I needed about 16-20 plants to collect enough at once to cook for a meal, but most were consumed fresh by myself and my office-mates.

When cooking, I highly recommend stir-frying with olive oil, garlic, course salt, and ginger (powder ok, but tiny slices of fresh ginger are amazing.) This has been a go-to quick side dish for many years, and I have usually used frozen SSP's. However, when using fresh, the crispness is very pronounced. They even stayed crisp through being refrigerated, microwaved, and consumed as leftovers the following day.

Yay for Sugar Snap Peas.

Tuesday, April 30, 2013

Tackling the Front Yard

April 2012 -- Yikes. 
When we moved in to our house a year ago, I was excited to have the backyard full of promise. I was less thrilled about our front yard. It is halfway covered by a huge flower bed, which is shaded most of the time and poorly kept. A good portion of the bed was bare (but for the weeds) and the rest was full of a haphazard arrangement of trees. There was also a huge hole for no apparent reason.

Now, I knew that I needed to do something with the front yard, so I kept it trimmed and filled the big hole with some Wandering Jew that I pirated from my parents' yard. I enjoyed the sudden growth of turmeric (as I have mentioned in a previous post) through the summer. As fall approached, I put in some pansies that I found on sale at the hardware store. But the front yard just didn't enchant me, as I was pretty convinced that I couldn't grow anything tasty in it because we have an HOA and places with HOAs frown on growing veggies in the front yard. WELL! I did some research, and according to our deed restrictions, we CAN have veggies anywhere we want, as long as they "blend with existing landscaping." Challenge accepted.

March 2013
I have recently become enamored with the concept of "Edible Landscaping" and Rosalind Creasy is my new hero. She pioneered the concept of having beautiful, edible plants as a decorative part of the landscaping, rather than just in utilitarian rows in a setting that screams "farm." She points out that you probably can't get away with having rows of corn in your front yard (although that's still a better use of land and water resources than useless lawn) but there are a lot of ways to make your (veggie) garden beautiful, and in doing so, keep the HOA off your back.

April 2013


Once I got it in my head to incorporate beautiful plants that you can eat with ones you can't, I started seeing the endless possibilities of the front yard. The plan I'd always had was a blend of purple and green, so I started with some Royal Burgundy beans that have dark green leaves, purple flowers, and long, purple bean pods. I added some asparagus fern (also pirated) and leafy lettuce to add a bright green to the mix. I thought I should add something else non-edible to balance out the fact that I was actually growing beans in the front yard, so I planted some caladium bulbs that came up a pretty white and green. (I have a fond attachment to caladiums, as I was given one small plant at a nursery when I was a young child, and it was MINE. Mom allowed me to stick it in the flower bed waaaaay in the back, and it flourished. I took great pride in this little caladium and it is still alive today, two decades later, hiding behind all of Mom's other landscaping.)

This is not (nor will it probably ever be) a finished project, but I feel much better about how it's looking so far. I'll keep posting the changes I make.

Friday, March 29, 2013

Wildly Experimental Orange Jelly

I have this fantastic orange tree in my back yard. It produces tons of tiny oranges year round. Literally, ALL YEAR ROUND. There is never a time that I've seen this tree without ripe oranges. Here's the problem though: they're incredibly sour. So sour that I had almost given up trying to use them for anything other than cleaning products and potpourri.
But I decided to redouble my efforts.

At the start, I had the best intentions of starting out by following the recipe exactly. That's generally a good way to go when you are trying something new, yes?

So I found this recipe. It's from a fantastic blog calls Food In Jars. How could I go wrong? Hah. Well, for starters, I didn't have liquid pectin. I had powdered. Internet to the rescue! Now that I had that substitution down (4 T powdered pectin + 3 oz hot water instead of a packet of liquid), I proceeded.

Well, I didn't want to make a whole bunch if it wasn't good, so I decided to halve the recipe.
Recipe says: 5 cups OJ, 5 cups sugar, 2 packs liquid pectin.
Instead, I would do 2.5 cups OJ, 2.5 cups sugar, 3 oz now-liquidy powdered pectin.

I juiced about 70 little oranges (since I pruned the tree and was gonna throw them out, which would be sad.) Now I had 2.5 C. fresh squeezed orange juice.

But wait! Turns out I don't have 2.5 cups sugar!
OK, we'll try 2.5 cups OJ, 2 cups sugar, 0.5 cup honey (probably... I eyeballed it because I hate measuring honey), and the dissolved pectin powder. So far so good, yes?

Now for the preparation. I dutifully poured the 2.5 C. fresh squeezed orange juice into the sauce pan and added the sugar and honey. I brought them to a boil. I was all set to use my candy thermometer to follow the instructions that it says are super important, about getting the mixture "greatly reduced" and up to 220 degrees. Then I
 realized that there was a crack in my candy thermometer. When did that happen? Rats. OK, so I'll use a meat thermometer. But that only goes up to 180 degrees. I guess I'll eye-ball it. The arrow kept going to what I assumed was 220, and the amount of liquid did seem to be getting smaller. I don't know how much is "greatly" reduced, but it did boil out about 12 oz. of liquid.
I added the pectin and boiled another 5 minutes.  Watch carefully! Oh, so much boiling over! (If you are not vigilant.)

OK, so not actually a water bath canner, but my largest pot with a
veggie steamer in the bottom of it.
Now for the jars. Of course you want to follow careful canning procedure here. I had been boiling the jars in my big old water-bath canner. I picked 3 12-oz jars, since that's how much 5 cups fits into.
I gently simmered the lids in a small pan of water, and made sure the bands were clean.

I added the boiling liquid to the hot jars (ended up filling only two of them perfectly), placed lids, tightened bands, and put them back in the canner for 5 minutes. After that, I pulled them out and the lids immediately popped. At least that part was right.

This turned out beautifully. It's still pretty tart, but if you are into that sort of thing, it's wonderful. We used it on Ritz crackers for Tea Party Tuesday. (An office tradition we follow to keep up morale on mid-week-slump days. Not to be confused with Tea Party Again Wednesday, which is when we have leftover cookies from Tuesday.)


Bonus: Use the leftover oranges and juiced orange peels to make garbage-disposal-cleaner-outers. Freeze in ice cube trays and save in a baggie.

Wednesday, February 20, 2013

Vertical Gardening on a Budget!

The things I am most looking forward to in my garden this spring and summer come on vines. Cherry tomatoes, cucumbers, peas (English and Sugar Snap), and beans. To make the most of my smallish yard, and give these little guys room to spread, I had to rig up some trellises and other vertical gardening set-ups, but as we are still in the "growing every day!" phase of our new business, I can't spend a whole lot of money. I have scoured the internet, but most of what I found and loved was beautiful and costly. Someday I will have gorgeous wrought iron Eiffel Tower plant stands, but not so much right now. Even the ones that required re-purposed wood would end up costing me, as I don't have much of that.  I finally came up with some plans that work for me.

Branch Arches (free)

I needed somewhere for my sugar snap peas to climb, and I love the idea of a tunnel of vines. We also had an abundance of branches suddenly, as we had a not-that-young-anymore cottonwood tree that was growing in a pot near the house that had to go. And by in a pot, I mean roots through the bottom of the pot very deep into the ground, and by near the house I mean two feet away from the house and banging up against our second-story bedroom window at every little breeze. Since moving it wasn't an option, being so firmly rooted, it met a sad demise at the hands of my husband's hatchet. Not being willing to let its sacrifice be in vain, we chopped and sorted the branches by size. The long, skinny, bendy ones became my archway. I stuck groups of three branches into the ground (about a foot and a half deep), and arched them together, securing with wire (that my dad had in the garage, that my grandfather saved for "just in case" and over thirty years later we found a good use.) As the Sugar Snap Peas grow, I am slowly training them to grab onto the branches with loosely tied twine.
Later in the season, I'm going to start some beans up the other side of the arch.


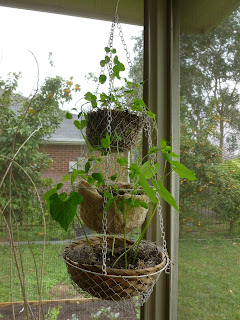
Hanging Baskets ($5-ish)

I read somewhere that peas and beans can grow in hanging baskets. Also, tomatoes that tend to vine, such as cherry tomatoes, can be done in baskets. I had some wire fruit baskets lying around, so I took an exploratory trip to the dollar store to see what I could stuff them with. I chose a woven basket that fills the bottom level($1 each), some spanish moss($1 per bag, fills one basket), and light brown dish towels (2/$1). If done over, I'd go with a different color towel. I was going for the burlap look, but I think it looks more like a formerly-white-but-now-stained towel.
The bottom level was easy. Basket + some moss + a coffee filter (to keep the dirt in) + potting soil.
The middle level was just the folded up towel + coffee filter + soil.
The top level was moss + coffee filter + soil.
I stuck English peas in the top two and green garden beans in the bottom. I hung them in the sunniest corner inside my screen porch.

Variation: Tomatoes!

Same layering process, only this time I planted some baby cherry tomato seedlings that I have been raising from seeds in my Guest Bedroom. These claim to be viney and very prolific yielders, so I'm excited about that.
Something I like about the hanging basket is that I can easily move it into the screen porch and back out again as weather changes. We had a really hard rain this week and I didn't trust little bitty seedlings to it. Bonus: The wrought iron bracket I hung it on was made by my grandfather 50 years ago.

Twine Pyramids ($14)
I had the great idea to grow beans and peas on the sides of my screen porch so that in the summer, maybe I'll get a little more shade. Then I realized that the vines may invade the screen itself and I needed a way to keep them back. I found the solution at the hardware store. I got some screw-in hooks ($5 because the only ones I could find were in a picture hanging kit but now I have a lot of them), a roll of twine ($3), and two packages of tent stakes ($3 for 6).


I installed the hooks as far out on the awning as I could get them, ran some twin through them, and staked the ends down in a triangle shape. The bonus to this (other than making a bunch of them for cheap) is that I can always add lines of twine between the three pieces to add more support, or more big lines just by throwing another stake in the ground. So far, my English peas seem to approve. Later there will be beans, too.


Tuesday, February 19, 2013

Turmeric!

So there's this nice leafy plant that grows in my yard. It comes up in spires that quickly uncurl into glossy green fronds. It's very tropical looking and pretty. However, underneath is something even better. It's turmeric! You dig up the plant and just below the surface is a big clump of orange fingers (rhizomes) that smell earthy but also kinda like Indian food. So you break them up and wash them off, and now you have a wonderful and flavorful spice.


One inch of grated turmeric substitutes for one teaspoon dried turmeric in your recipes. Make sure to wear gloves when working with this stuff. You know the yellow stain that mustard leaves? It comes from turmeric.
My landlord claims that turmeric prevents all cancers. I'm not certain that this is true, but I would be willing to agree that it's probably good for you. Plus it's tasty. Here's what I made with it:

Turmeric Rice and Broccoli Chicken Stir Fry

Ok, it doesn't look like anything special, but it's really good. Doesn't take that long, either. 

I found the Turmeric Rice recipe on food.com. The Turmeric Chicken and Broccoli Stir Fry  came from tablespoon.com. These recipes are both wonderful and I highly recommend you try them. The only change I made was to use fresh turmeric instead of dried. I peeled the skin off and grated it on a grater plate (ceramic plate with spiky bits that you rub the fresh root on) and used it with the ginger instead of with the dry spices. Enjoy!


Surprise Tomatoes!

Back in summer of 2012 (probably July-ish) I noticed some cute little sprouts in my compost bin. (At that time, it was a literal bin...a small rubbermaid bin with holes drilled in it. I carefully transplanted the little sprouts into the flower bed. Most of them met their demise by weed-whacker-weilding gardener, but two lived. Of those two, one grew only about 16 inches tall, and the other became a fabulous cherry tomato vine!

 Now, while I originally assumed that this would end poorly for the little guy, as winter was coming, I started to notice how vigorous it was. By mid-November, I found this.
Crazy, right? But it kept on going! Suddenly, tomatoes were ripening every day!

I started to take more care to keep this plant healthy. I already have acidic soil, which the tomato seems to like. It's in a corner of my flowerbed facing south, so it gets lots of sunshine. That particular corner gets warm, even in the winter because it's sheltered from wind but sunny. (We have a window-mounted  thermometer, named Wildly Inaccurate Thermometer, who claims --among other things-- that the temp gets up to the 90's in winter... which I doubt. But that corner is warm.) I have had to throw a few blankets over it when the temperature crept down into the mid-30's at night, just a few times. Thankfully we never had a hard freeze. I hate freezes.


 By January, I started to pull them when they were just starting to turn and let them ripen on the windowsill.

Then Mrs. A told me that if you hang red Christmas ornaments on your vine, it will confuse the birds.

Notice how the (seemingly) nicest, reddest tomato is fake? Well, birds go straight for that and then think "What's up with these tomatoes? I'm outta here!" and the others survive. So now I have been able to let the tomatoes safely ripen all the way on the vine. The question now is, what to do with them all?
I have added them to BLT's (Slobolt lettuce also from the garden), canned for sauces and soups (more on that later), given to friends, family and neighbors, and still they come!  Yay for Surprise Tomatoes!

Monday, February 18, 2013

Fruit Fun!

There are many things I like about this house. One is the fireplace in the office for cold mornings. One is the screened in porch, which is just heaven on a summer night. But out in the yard is another thing: an abundance of fruit trees. Let me give you an idea of what we are working with here. 

Sour Oranges. Not good eating, but pretty good for marmalade.
Tiny sour oranges. Same problem as the big ones, just more of them. We did get some good oranges and some tangerines that were perfect, though. 
Bananas!

So many bananas! I pulled some off the tree and made banana bread. I felt like a pioneer. 

Grapefruits. So delicious!


We ended up with about 50 of them from mid-November to late-December.
Greek platter put together for the Olympics. The mint and the figs grew in my yard. 

 And there were some things that didn't go so well. The papayas that never ripened, for example.
Also, the pomegranates that got all diseased and sad. Gosh I hope those grow better next year.